Session 2: BHT Cluster and Experiments Logging
Learning goals
Understand cluster concepts for Data Science with Kubernetes
Pods, Deployments, Services, Jobs, ...
Run interactive and batch workloads on our BHT cluster
Work resource-aware (CPU, RAM, GPU, storage)
Log experiments with Weights & Biases (WandB) to track while running on the cluster
BHT cluster
Multiple nodes with CPUs, RAM, and GPUs for more computing power than your laptops
Monitor the resources in Grafana
This is what it sounds like: Youtube Video
Here you find the documentation: BHT Cluster Documentation
Dashboard for your own workspace: Headlamp
Before we start with the tutorial, lets take a look at the GPUs:
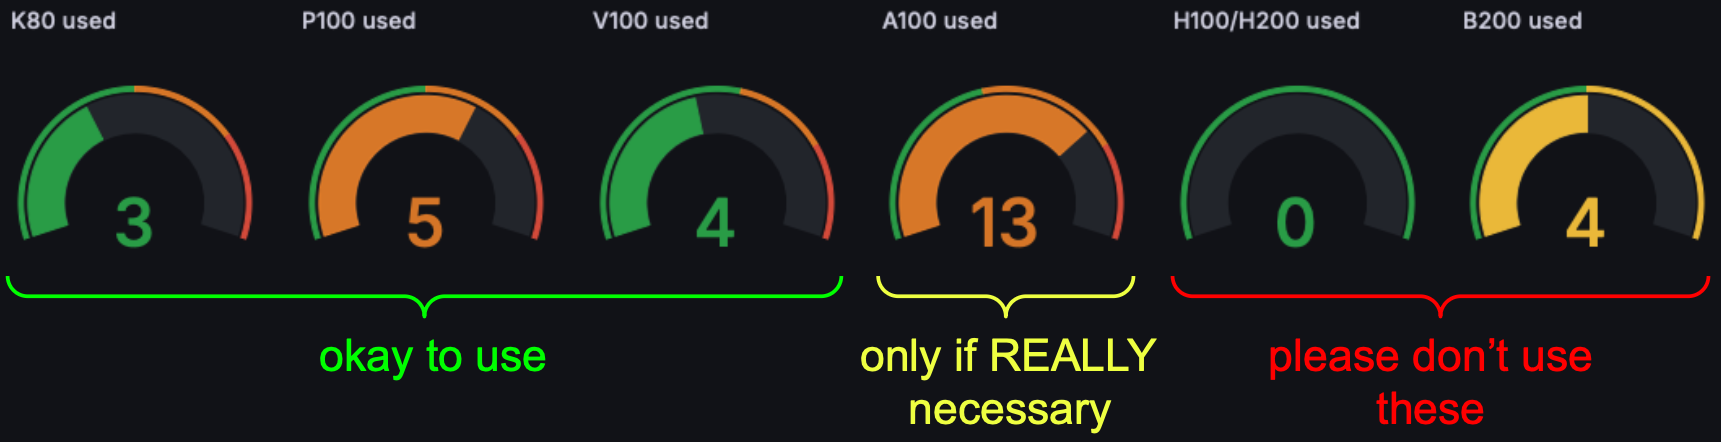
⚠️ Please be mindful of the resources you use on the cluster. PhDs and students are sharing the same cluster, so we need to be considerate of each other.
Kubernetes
Open-source system for managing containerized apps
Deploys, keeps your apps alive
Second-largest open-source project after Linux
Kubernetes core concepts
Pod: Smallest deployable unit that runs docker containers
Job: One-off task that run to completion and then stop
Deployment: Keeps desired number of pods alive, restarts if they fail
PVC: Persistent Volume Claim, requests persistent storage
Secret: Stores sensitive info (like SSH keys)
Others: Namespaces, Cronjobs, Services ...
Docker concepts

Image: Blueprint for a container, includes code and dependencies
Container: Running instance of an image, isolated environment
Dockerfile: Instructions to build an image
Docker Hub: Public registry for sharing images
Example Dockerfile:
FROM python:3.10-slim # Use a parent image
WORKDIR /app # Set the working directory in the container
COPY . /app # Copy the current directory contents into the container at /app
RUN pip install --no-cache-dir -r requirements.txt # Install packages
CMD ["python", "main.py"] # Run main.py when the container launches
Prerequisites for working on our cluster
You should have done the following already (as described at the end of Session 1):
BHT account
Internet access with a VPN connection to BHT (see: https://
doku .bht -berlin .de /zugang /vpn) Access rights to the cluster (should be taken care of)
Install
kubectl: https://kubernetes .io /docs /tasks /tools/ Configure
kubectlfor BHT login (see: https://docs .cluster .ris .bht -berlin .de /user /quickstart / #direct -kubernetes -access) Install
docker: https://docs .docker .com /get -docker/
Recommended: VSCode (Tutorial will show an example for VSCode)
Setting up your namespace
For the following tutorial (and in general), it is easier to set your namespace as the default context in kubectl. This way, you don’t have to specify the namespace for every command.
To set your namespace as the default context, run the following command:
kubectl config set-context oidc_ds_cluster --namespace=<campus_account>Replace
<campus_account>with your actual campus account name.
First Python code on the cluster
Example: Printing “Hello from the cluster!” using a Job
Step 1: Download the Cluster Files (.zip) file from the downloads section.
Step 2: Store it somewhere on your computer and open hello-cluster-job.yml with an editor (e.g. VSCode).
Step 3: Send it to the cluster:
kubectl apply -f hello-cluster-job.ymlStep 4: Check the status of your job:
kubectl get jobsStep 5: Check the logs of your job:
kubectl logs job/hello-cluster-jobYou should see the following output: Hello from the cluster!
Step 6: Clean up the job from the cluster:
kubectl delete job hello-cluster-jobPrototyping Workflow: SSH into your pod with VSCode
You can use VSCode’s Remote Development Extension to SSH into your pod and work on the cluster directly from your editor.
This allows you to run code, edit files, and monitor resources without leaving VSCode.
Prerequisites
A password-protected SSH key pair for authentication
A Kubernetes secret that injects the public SSH key into the pod
Step 1: Generate a new SSH key pair
ssh-keygenFollow the prompts to create a new key pair (e.g.,
id_rsa_clusterandid_rsa_cluster.pub)Make sure to set a password for the private key
Save the keys in a secure location on your computer (usually in
~/.ssh/)
Step 2: Create a Kubernetes secret with your public SSH key (ends with .pub)
kubectl create secret generic ssh-key-secret --from-file=authorized_keys=~/.ssh/id_rsa_cluster.pubReplace
~/.ssh/id_rsa_cluster.pubwith the actual path to your public SSH key if it’s differentThis command creates a secret on the cluster named
ssh-key-secretthat contains your public SSH keyThis can be mounted into your pod to allow SSH access, check it with:
kubectl get secretsStep 3: Create a local SSH config file (if you don’t have one already)
For Mac/Linux:
touch ~/.ssh/configFor Windows (PowerShell):
New-Item -Path $env:USERPROFILE\.ssh\config -ItemType FileOpen the config file in an editor (tip for VSCode: code ~/.ssh/config) and add the following configuration:
Host bht-cluster
    HostName localhost # We connect through port forwarding
    Port 2222 # This is the port you will forward to your pod
    User root
    IdentityFile ~/.ssh/id_rsa_cluster # Path to your private SSH key
Prerequisites are now set up, next we can setup a pod.
Setting up Your Own Pod (Docker + Kubernetes)
Step 1: Claim a persistent volume with a PVC, for storing code and data:
Open the file
storage-pvc.ymlfrom the downloaded cluster files:apiVersion: v1 kind: PersistentVolumeClaim metadata: name: dsw-pvc spec: accessModes: - ReadWriteOnce # Use ReadWriteMany if you have multiple Pods needing to write to the volume resources: requests: storage: 5Gi # Start low, you can always increase but NOT decrease the storage size laterApply it to the cluster:
kubectl apply -f storage-pvc.ymlThis creates a persistent volume claim named
dsw-pvcthat requests 5GB of storage. You can check the status of your PVC with:kubectl get pvc
Step 2: Create a docker image with an SSH server
Open the file
Dockerfilefrom the downloaded cluster files:Navigate to the directory where you downloaded the Dockerfile and build the image:
docker build -t ssh-server-image --platform linux/amd64 .Start the container locally to test it:
docker run -p 2222:22 ssh-server-imageThis command runs the container and forwards port 22 inside the container to port 2222 on your local machine, allowing you to SSH into it using the configuration we set up earlier.
Step 3: Push the image to a container registry
You need to push your image to a container registry that our cluster can access.
Example: Docker Hub (PUBLIC)
Name your image with your Docker Hub username:
docker tag ssh-server-image <your-dockerhub-username>/ssh-server-image:latestOptional: If not already done via e.g. Docker Desktop, login:
docker login hub.docker.comPush to Docker Hub:
docker push <your-dockerhub-username>/ssh-server-image:latest
For private registries, have a look at the cluster documentation: https://
docs .cluster .ris .bht -berlin .de /user /images/
Step 4: Create a Kubernetes deployment that uses your image and mounts the PVC
Open the file
remote-deployment.ymlfrom the downloaded cluster files:Modify the following parts:
Under
containers.image, replaceyour-dockerhub-username/ssh-server-image:latestwith the name of your image in the container registry.Under
volumes, make sure theclaimNamematches the name of your PVC (e.g.,dsw-pvc).Under
volumes, make sure thesecretNamematches the name of your SSH key secret (e.g.,ssh-key-secret).
Apply the deployment to the cluster:
kubectl apply -f remote-deployment.ymlCheck the status of your deployment:
kubectl get deployCheck the status of your pod:
kubectl get podsCheck whether your pod is using the volume:
kubectl describe pod <pod-name>
Once your pod is running you can proceed and connect to it via SSH.
Step 5: Port forward to your pod to enable SSH access
Kubernetes pods are not directly accessible from outside the cluster. To SSH into your pod, you need to set up port forwarding from your local machine to the pod.
Start port-forwarding in a terminal:
kubectl port-forward <pod-name> 2222:22
Replace
<pod-name>with the actual name of your pod (you can get it fromkubectl get pods)This command forwards port 22 in the pod to port 2222 on your local machine.
Keep this terminal running as long as you want to have SSH access. It’s your live bridge to the pod.
Connect to the pod using SSH:
ssh bht-cluster
This uses the SSH configuration we set up earlier to connect to the pod through the forwarded port.
You should be prompted for the password of your SSH key.
Congratulations! You are now connected to your pod on the cluster via SSH!
Step 6: Connect your VSCode to the pod
In VSCode download the “Remote Development” extension pack if you haven’t already.
Click on the “Remote Window Icon” (“><”) in the bottom left corner or press ‘Ctrl+Shift+P’ and select “Remote-SSH: Connect to Host...”.

On the dropdown, select “bht-cluster” (or whatever you named your host in the SSH config) and enter the password for your SSH key when prompted.
Once connected, you might want to install some VSCode extensions in the remote environment (e.g. Python extension) to make your life easier when working on the cluster.
As a tip you can install all extensions from your local VSCode to remote through the command palette (Ctrl+Shift+P) and select “Remote-SSH: Install Local Extensions in Remote...”.

Often times you need to reload the window. For this you can press ‘Ctrl+Shift+P’ and select “Reload Window”.
You can now open terminals, edit files, and run code on the cluster directly from VSCode! This allows you to work on the cluster as if it were your local machine.
Don’t forget
We have mounted the PVC to
/storagein the container, so save everything you want to keep on the cluster to that directory.EVERYTHING outside will be lost once the pod is restarted.
Step 7: IMPORTANT! Always close your deployment pod once you’re done!
Unlike jobs, deployments will keep running and don’t shut down automatically.
They keep blocking resources! (People will hate you for that, especially if you are using GPUs)
You can scale down your deployment to zero replicas to stop it:
kubectl scale deployment dsw-deployment --replicas=0or you can delete the deployment entirely:
kubectl delete deploy dsw-deploymentNext time you want to use it again, you can scale it back up:
kubectl scale deployment dsw-deployment --replicas=1or re-apply the deployment file:
kubectl apply -f dsw-deployment.yml
Connect a terminal to your pod
You can also connect a terminal to your pod without SSH, using
kubectl exec:kubectl exec -it <pod-name> -- /bin/bash
How to get code and data onto the cluster?
There are many ways, here are a few common ones:
Docker Image: You can build a Docker image that contains your code and dependencies, by copying into the image:
COPY <src-path> <destination-path>Data can also be copied into the image, but is not recommended for large datasets. Better to use a PVC for that.
Git: You can clone a Git repository directly inside your pod. This also allows for version control.
However, you need to set up Git credentials and authenticate it every time your pod restarts.
Kubectl cp: You can copy files from your local machine to the pod using
kubectl cp:kubectl cp <local-file-path> <pod-name>:<destination-path>This is very useful, you can also copy files directly into the PVC if it is mounted in the pod.
However, depending on your Upload speed and the size of the files, this can be slow.
Curl: You can use
curlto download files directly into the pod:curl -o <destination-file-path> <file-url>Download speed on the cluster is really fast, so this is a good option for large files.
You can also download files from the BHT cloud (Nextcloud) like that, if you have a public share link for the file or folder.
If you download a folder structure as a zip file, you need to unzip it on the cluster. Download the
unzippackage if it’s not already available.
How to keep processes running after disconnecting or closing the terminal?
Use screen for creating detachable terminal sessions on the cluster. Your processes will keep running even if you disconnect or close the terminal.
Start a session:
screen -S dswReconnect later:
screen -r dswList active sessions:
screen -ls
For Jupyter Notebook fans
You can work in VSCode on the cluster with Jupyter notebooks, as well. Your environment just needs to include the juypter dependancies and the “Jupyter” extension.
Alternatively, you can use the managed Jupyterhub on the cluster:
https://
Final Advice: Cluster Documentation is your friend
If you encounter any issues, check the cluster documentation:
Cluster Prototyping vs Cluster Jobs
Prototyping
Fast for exploration and debugging
Best when requirements are still changing
Risk: manual steps are harder to repeat
Jobs
Best for repeatable training or evaluation runs
Runs unattended and is easier to reproduce
Risk: slower to debug and needs more setup
Rule of thumb: prototype first, then move stable workflows into jobs.
Resource awareness
How to request resources for your workloads on the cluster?
Important:
Always request only what you need, especially for GPUs!
When using GPUs, your job / deployment will be automatically killed when idling for more than 4h.
GPU request example
    ...
      resources:
        requests:
          nvidia.com/gpu: 1 # Request 1 GPU
        limits:
          nvidia.com/gpu: 1
    ...
    nodeSelector:
        gpu: k80
    ...
PVC example
  resources:
    requests:
      storage: 10Gi
Experiment logging with WandB

Compare experiments across parameter choices
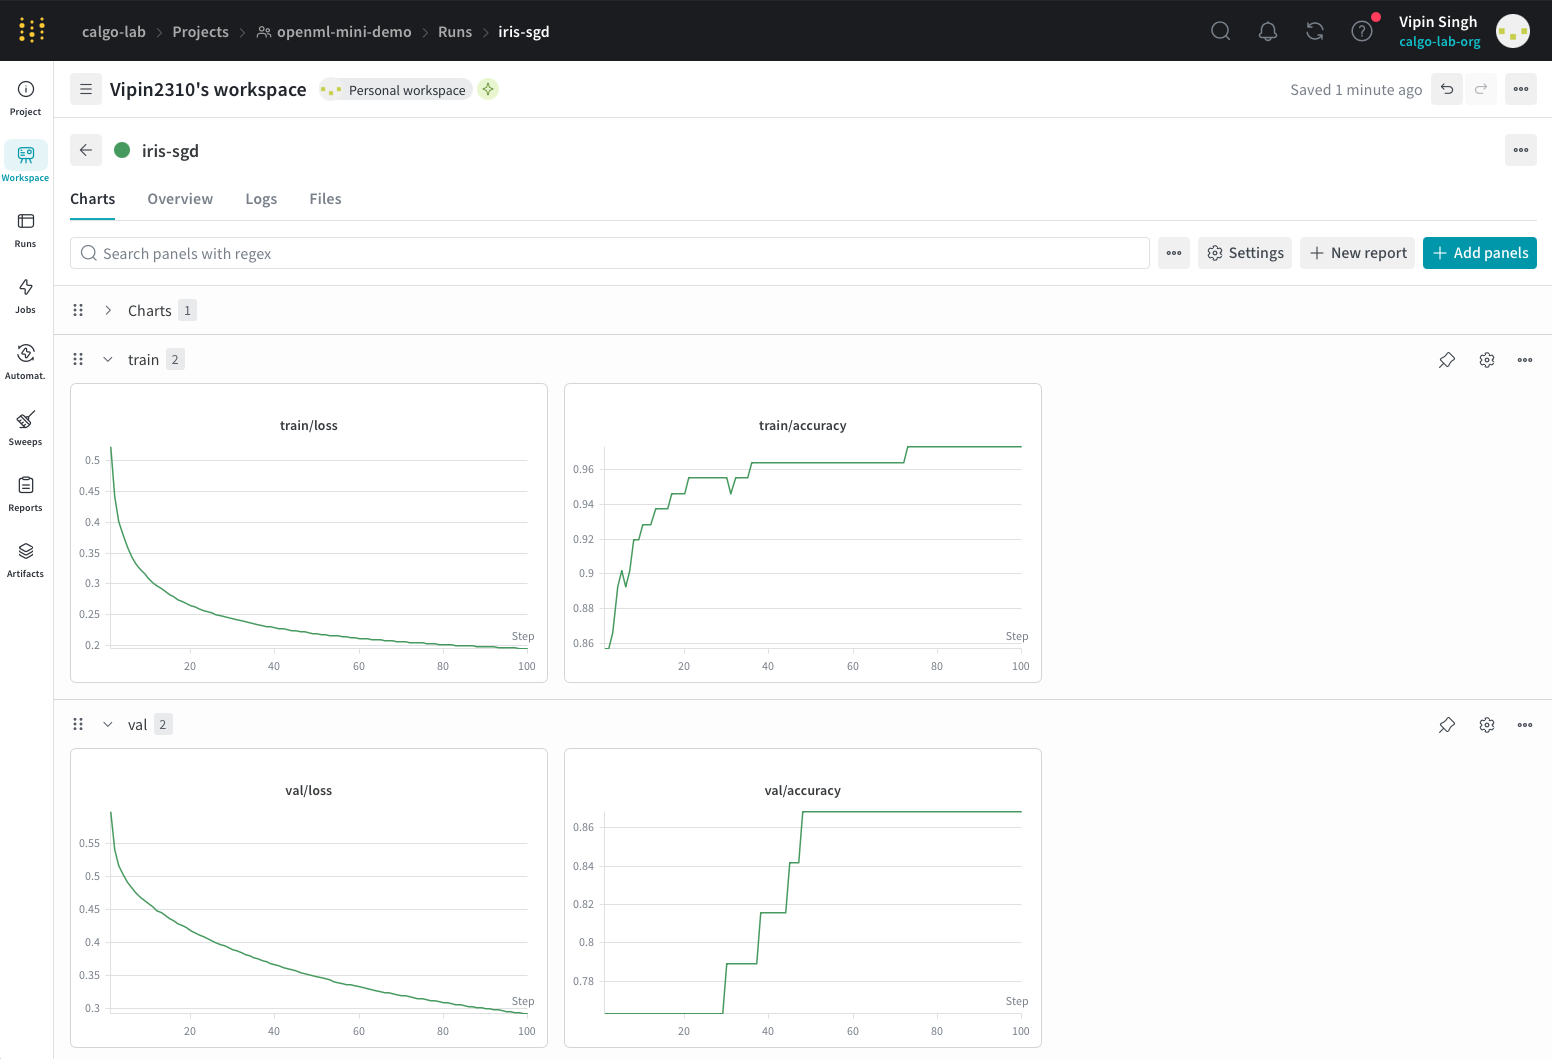
Track artifacts, metrics, and training curves online in a web interface
Enable reproducibility and team collaboration
Hyperparameter sweeps for automatic tuning
Create an account here: https://wandb.ai
Minimal setup
Install the dependency and login to your WandB account:
pip install wandb
wandb login
Short example:
import wandb

wandb.init(project="dsw-2026", config={"lr": 1e-3, "batch_size": 32})
wandb.log({"train_loss": 0.42, "val_iou": 0.71})
wandb.finish()
WandB example on the cluster
Download the wandb_example.py file from the downloads section and run it on the cluster.
Bonus: Use time.sleep(2)to simulate longer training time and run the script in a screen session on the cluster. This lets you see the training progress live in the WandB dashboard, while you can disconnect.
Summary Session 2
BHT cluster provides powerful resources for Data Science workloads
Kubernetes and Docker concepts
Prototyping workflow with SSH and VSCode Remote Development
Resource-aware workloads
Experiment logging with Weights & Biases (WandB) to track while running on the cluster